
PacketMole
User Manual
Your home internet, anywhere in the world.
Version 1.19 · 2026-09-15

Thank you for picking up PacketMole. In about 10 minutes, you'll have your own personal travel-router setup that lets your phone, laptop, and other devices use your home internet connection from anywhere — a hotel in Tokyo, a cafe in Lisbon, your parents' guest room in Ohio.
PacketMole is a one-time hardware purchase: PacketMole does not charge a recurring subscription or require a PacketMole account. Operation still depends on compatible third-party services, supported hardware/software, and working internet connections.
You have two small routers in this box.
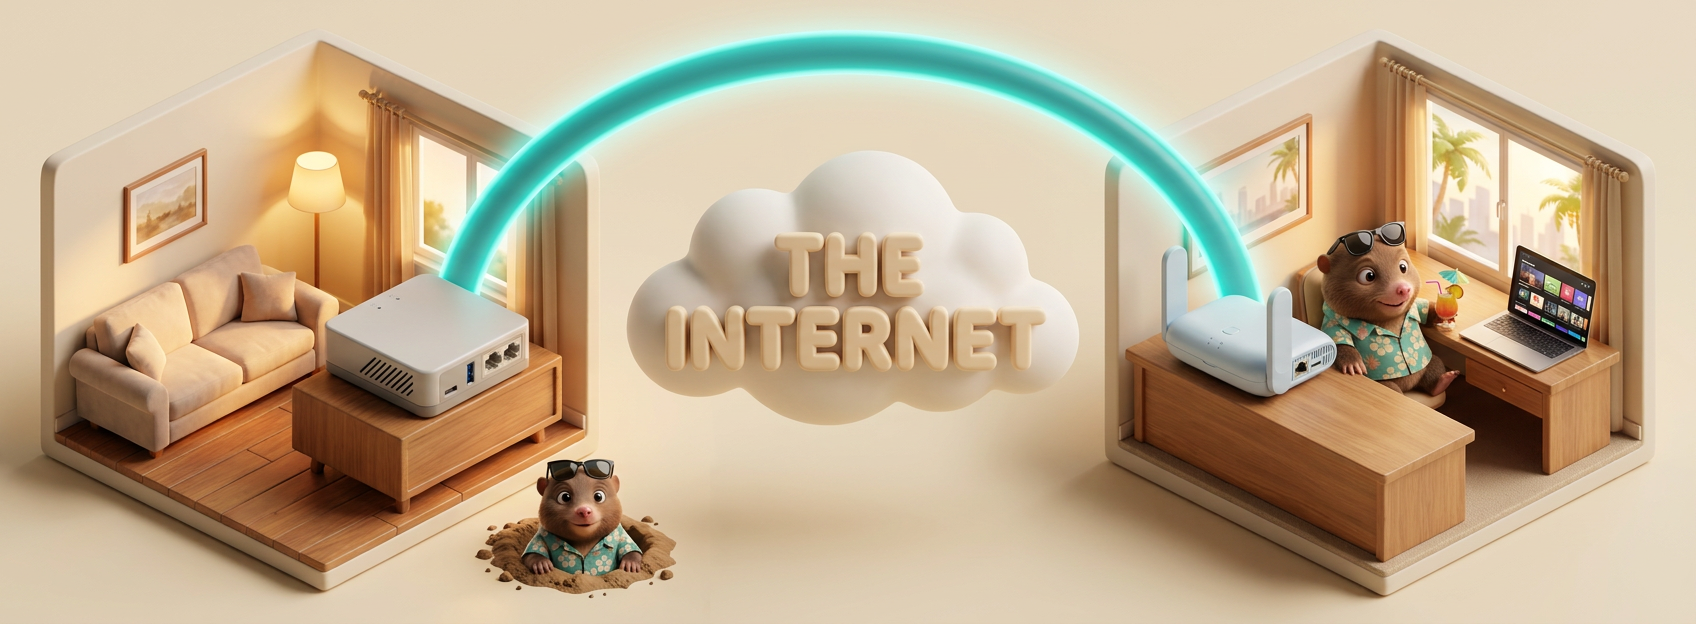
When you're on the road and connect your phone to the travel router, the travel router secretly reaches all the way back to the home router, then sends your traffic out through your home internet connection. Every website you visit thinks you're sitting on your couch at home.
That's it. That's the whole product.
A typical commercial VPN uses a shared data-center exit address. PacketMole instead uses your home connection. That changes the network address services see, not your physical location, and does not guarantee access to any service.
Open the box and you'll find:
| Quantity | Item |
|---|---|
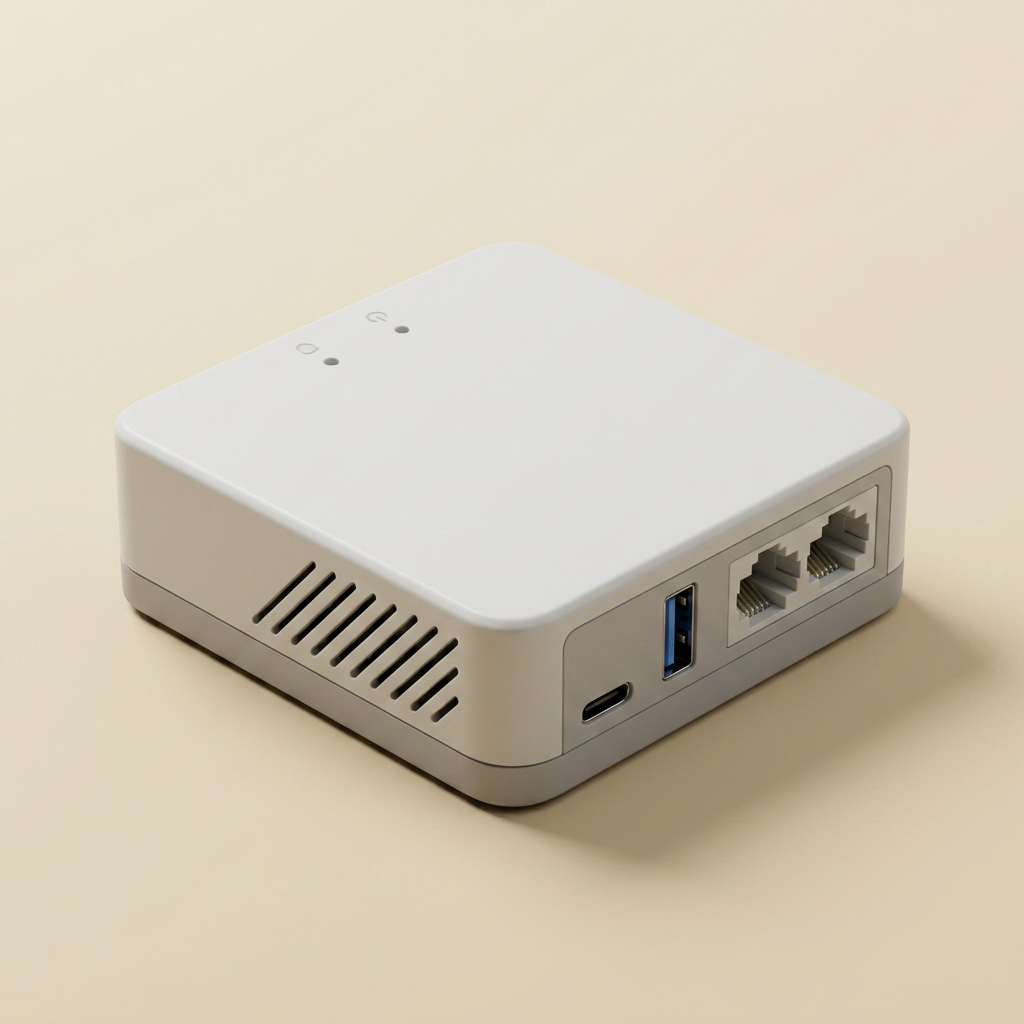
| 1 | Home unit — silver-grey aluminum brick, no antennas. Stays plugged in at home. |
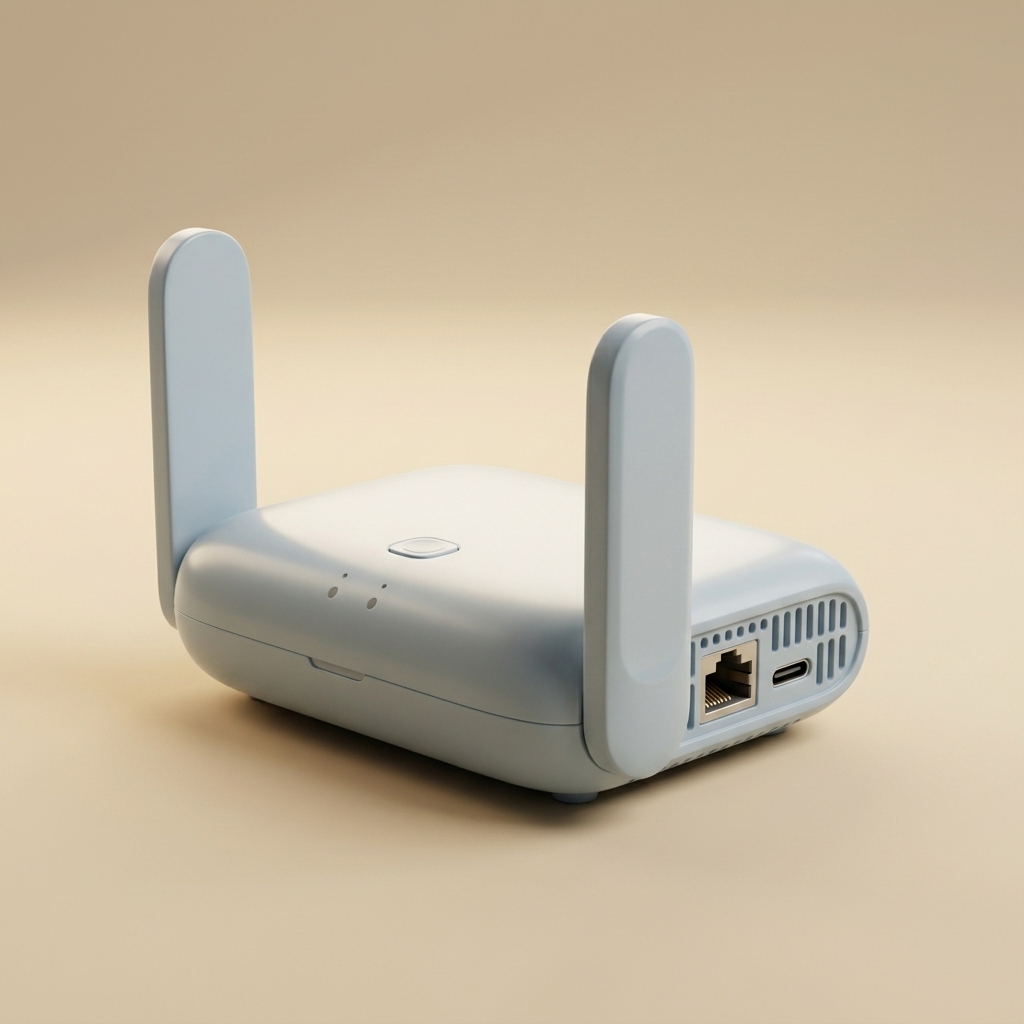
| 1 | Away unit — small router with two foldable antennas. Travels with you. |
| 1 | AC power adapter — for the Home unit. The US plug detaches for packing; click it back on before use. |
| 1 | USB-C cable — powers the Away unit from a USB-C source rated to supply 5V/3A. |
| 1 | Ethernet cable — short, white. Connects the Home unit to your home router. |
| 2 | Setup cards — one per unit. Each card has a QR code, the unit's Wi-Fi name + password (if any), and an admin password unique to your unit. The two units look different — the Home unit is a plain brick, the Away unit has antennas — and each card shows which is which. |
| 1 | Printed Quick Start booklet — the full manual you are reading is website-only at packetmole.com/manual. |
You'll also need one thing we don't include: a second Ethernet cable, one you already own, just for the one-time Home unit setup (to connect a laptop to it). Most homes have a spare; if not, they're about $5, or borrow one for five minutes from anything already wired in — a TV, game console, or desktop.
Save your passwords where you'll always have them. Put your Away unit's Wi-Fi name and password, and each unit's admin password, into your password manager app. Most phones have one built in (iCloud Keychain on iPhone, Google Password Manager on Android), or use whatever you already use (1Password, Bitwarden, and so on). That copy syncs to your phone, so you'll have it everywhere — including on the road, where the Away unit's Wi-Fi password is the one thing you can't recover if a device ever forgets the network. Keep the physical cards too.
Firmware availability note: The Venue sign-in window described below is documented for a pending PacketMole firmware update and is not available on earlier units until that update has been validated on production hardware and installed. If your setup page does not show that control, use a phone hotspot or ask the venue for help rather than assuming direct access is open.
Before you touch either router, you'll need a free Tailscale account. Most customers have never heard of Tailscale, and that's fine — you don't need to understand it to use it. It's a free, third-party service that we use under the hood to let your two routers find and talk to each other privately. The account is yours; you create it on Tailscale's website. We never see it. That's how we keep our "no account with us" promise.
Total time: about 2 minutes. You only do this once, before either router is plugged in.
Open any browser (on your phone or laptop, doesn't matter which) and go to tailscale.com.
Tailscale's homepage has a prominent Get started or Use Tailscale free button. Click it.
Tailscale doesn't ask you to create a new username and password. Instead, it asks you to sign in with an account you already have:
@gmail.com)@outlook.com, work/school)@icloud.com)Pick whichever you'll remember. Use a personal account — not a work Google Workspace or Microsoft 365 account if you can avoid it. (Personal accounts go straight onto Tailscale's Personal plan, which is currently free for up to 6 users and unlimited devices. Work accounts sometimes get nudged into a 14-day trial of a paid plan.)
You don't need to download anything, install anything, or configure anything on Tailscale's site. The setup wizards on each of your two routers will ask you to sign back in to this account in a few minutes — that's the only time you'll see Tailscale's site again.
Why do we use Tailscale? It's how the two routers find each other through home routers, hotel Wi-Fi, cellular networks, and apartment-building internet without any port-forwarding or technical setup. It's also why PacketMole works behind T-Mobile Home Internet, Starlink, cellular, and apartment ISPs that silently break competing products.
About privacy. Tailscale routes encrypted traffic between your two routers. They can't see what you're browsing — only that two devices on your account are talking. Your traffic eventually exits through your own home internet (where you wanted it to go anyway).
Will I be charged? PacketMole does not charge a subscription. Tailscale currently offers a free Personal plan for eligible non-commercial use. Tailscale controls its plan terms and pricing; business use may need a different plan. Check tailscale.com/pricing. Continued operation depends on compatible Tailscale service, working internet, and supported hardware/software; a future plan change is not guaranteed to be free or seamless.
Total time: about 4 minutes. Do this part first, while you're at home.
The Home unit has no Wi-Fi (this is by design — keeps things simple and avoids interfering with your home Wi-Fi). You'll connect to it directly with an Ethernet cable to do the one-time setup.
No spare Ethernet cable? You only need one for this one-time setup. They're about $5 at any electronics store, or borrow one for five minutes from anything already wired in — a TV, game console, or desktop computer.
http://192.168.8.1/setup/ and press Enter.If nothing loads, see the Troubleshooting chapter — most likely your laptop is still using your home Wi-Fi instead of the new Ethernet connection. Turn off your laptop's Wi-Fi temporarily.
The first screen is a short license summary covering personal-use only, no firmware redistribution, over-the-air software updates (delivered automatically over the internet, so you never plug in a cable to update), and the current returns and hardware-problem policy. Read it, check the I have read and agree to the terms above box, and click I Agree — Continue. The page advances to the role-badge state with a big HOME badge.
(The full terms are at packetmole.com/legal/terms.)
Button greyed out? Right after the unit boots, the page may briefly show "Preparing your secure sign-in link…" while it gets ready. Give it a few seconds and the Sign in with Tailscale button becomes clickable.
Within a few seconds, the page should advance to the next step.
This is a one-time approval Tailscale requires before your Away unit can route through home. You do it yourself in the Tailscale admin console. The setup page may already show All set by now — do this step anyway, to be sure.
login.tailscale.com/admin/machines and sign in with the same Tailscale account if asked.Nothing to approve? If there's no "awaiting approval" badge and the exit node is already enabled, you're already set — consider it a bonus and move on. We list this step unconditionally because the setup page can't always confirm the route approval for you.
Saw "Connected, but traffic isn't flowing yet — checking…"? That's the setup page telling you the tunnel is up but your traffic isn't reaching home yet — usually because this step (exit-node approval) isn't finished, or the network is interfering (see the troubleshooting section). It re-checks on its own; once traffic flows it returns to All set. If it lingers, finish the approval above, then check the network's security software.
Once you've approved the exit node (Step 6) and the setup page shows All set, your Home unit is finished. You can:
Put the Home unit on a dry, ventilated surface away from heat sources. Leave space around it and check it before traveling; power, internet, and sign-in problems can still need attention.
Optional: A remotely controlled smart plug, set up and tested before travel, lets you restart the Home unit while you're away. See the FAQ for details.
Total time: about 4 minutes. Do this while you're still at home.
That's it for physical setup. You don't need to plug the Away unit into anything — no Ethernet cable, no special location.
Plum-Leopard-847 or Cobalt-Crane-499, picked at random for your unit.Your phone is now connected to your Away unit's private Wi-Fi. This is the Wi-Fi name and password you'll keep using forever — even when you take this unit on the road.
Most of your devices (phone, laptop, tablet) can join this network now and save the password for later. Automatic reconnection and operation still depend on the device, local network, and country allowing the connection.
Want to rename it? The default name is intentionally generic so the Away unit blends in with home Wi-Fi networks at hotels, cafes, and Airbnbs. If you'd rather use a name that matches your real home Wi-Fi (so your devices feel "at home" everywhere), or pick something else entirely, you can rename it from the setup page after you finish initial setup — see Renaming your Away Wi-Fi later in this manual. For maximum discretion, avoid product-revealing names like "PacketMole", "VPN", or "TravelRouter".
http://192.168.8.1/setup/ and press Enter (or tap Go).Phone or laptop — your choice. Unlike the Home unit (which has no Wi-Fi, so it needs a wired laptop), the Away unit broadcasts Wi-Fi. Any device on its network can run the rest of this setup. A laptop is often easier for the Tailscale sign-in.
A couple of normal iPhone pop-ups can make this step look stuck when it isn't — none of them mean anything is wrong.
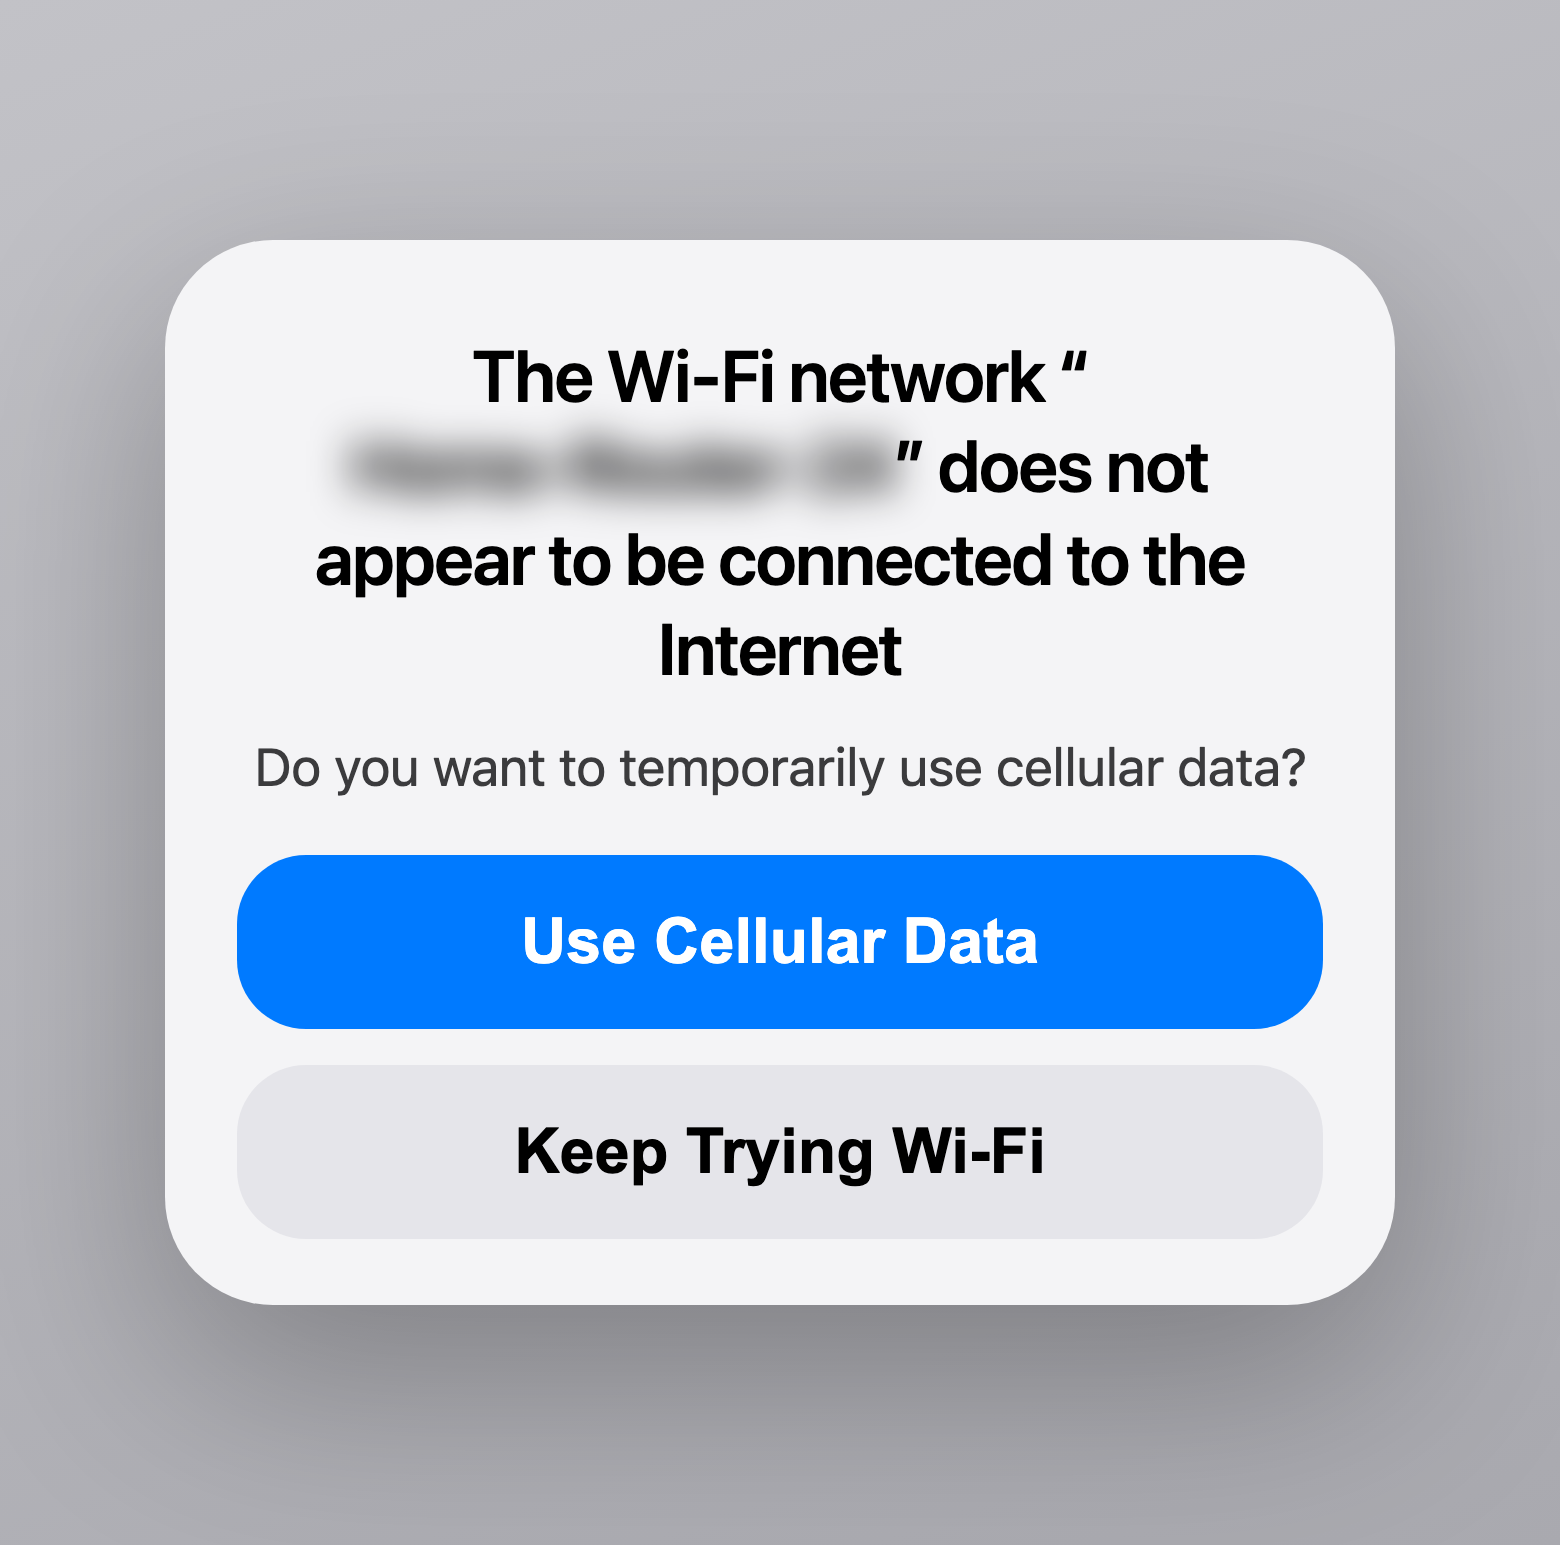
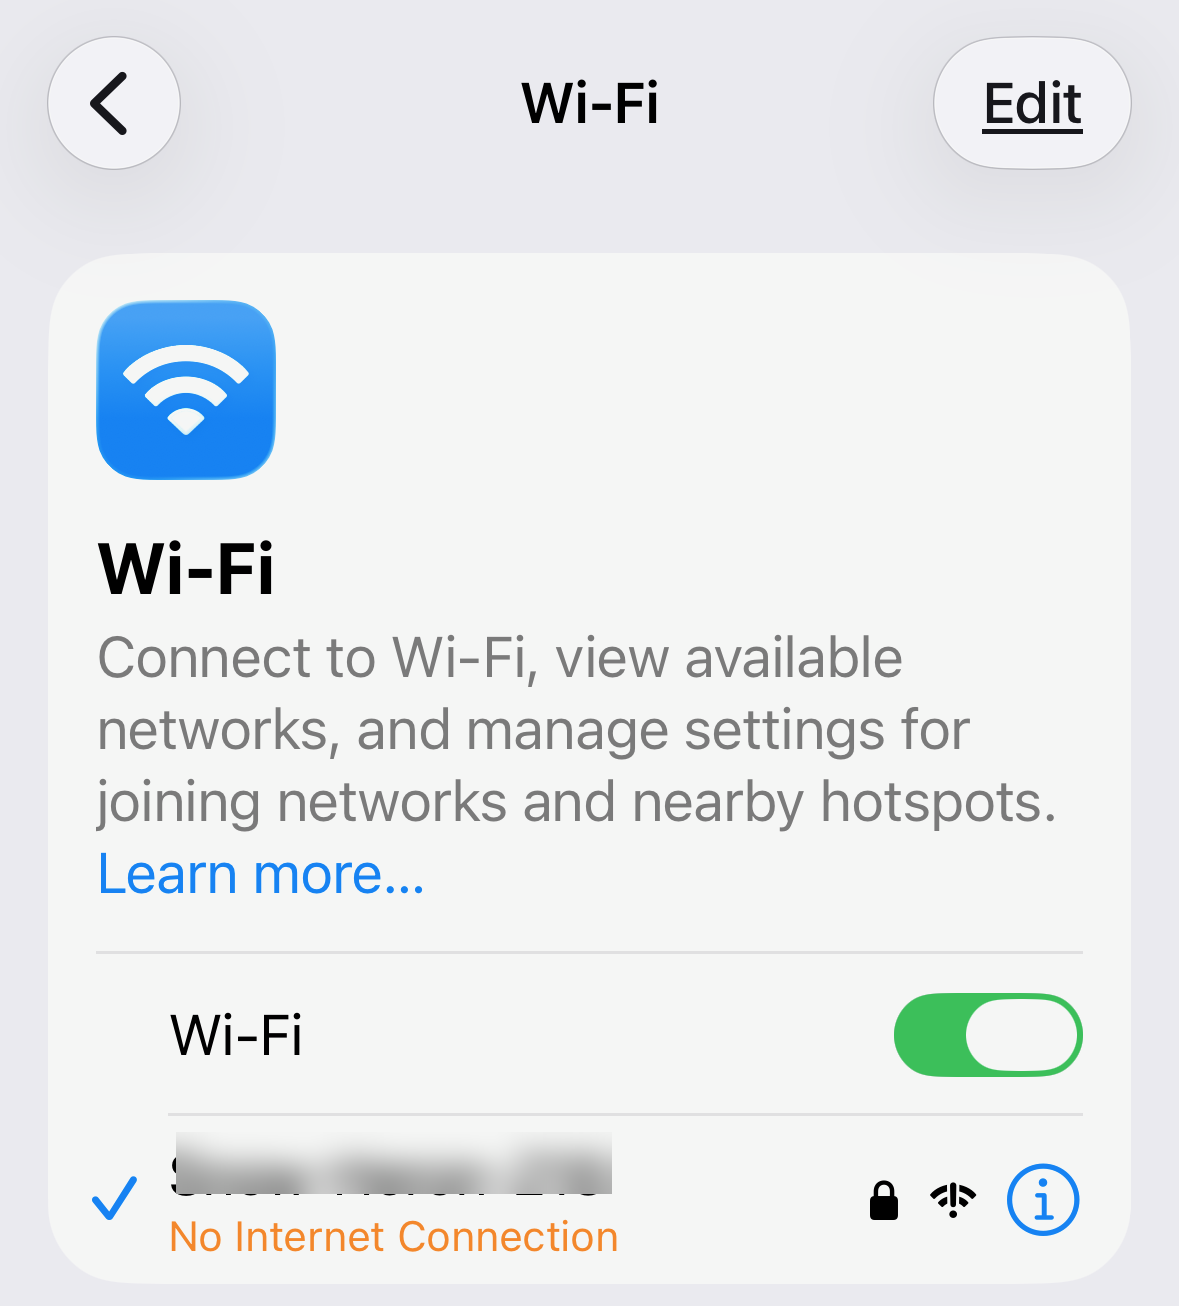
"No Internet Connection" — always tap "Keep Trying Wi-Fi." While your phone is on the Away unit's Wi-Fi, your iPhone may warn that the network has no internet and offer to switch to cellular. During setup that's expected — the Away unit isn't linked to your Home unit yet. If you tap Use Cellular Data, your phone leaves the Away unit's Wi-Fi and the setup page won't load. Always choose Keep Trying Wi-Fi.
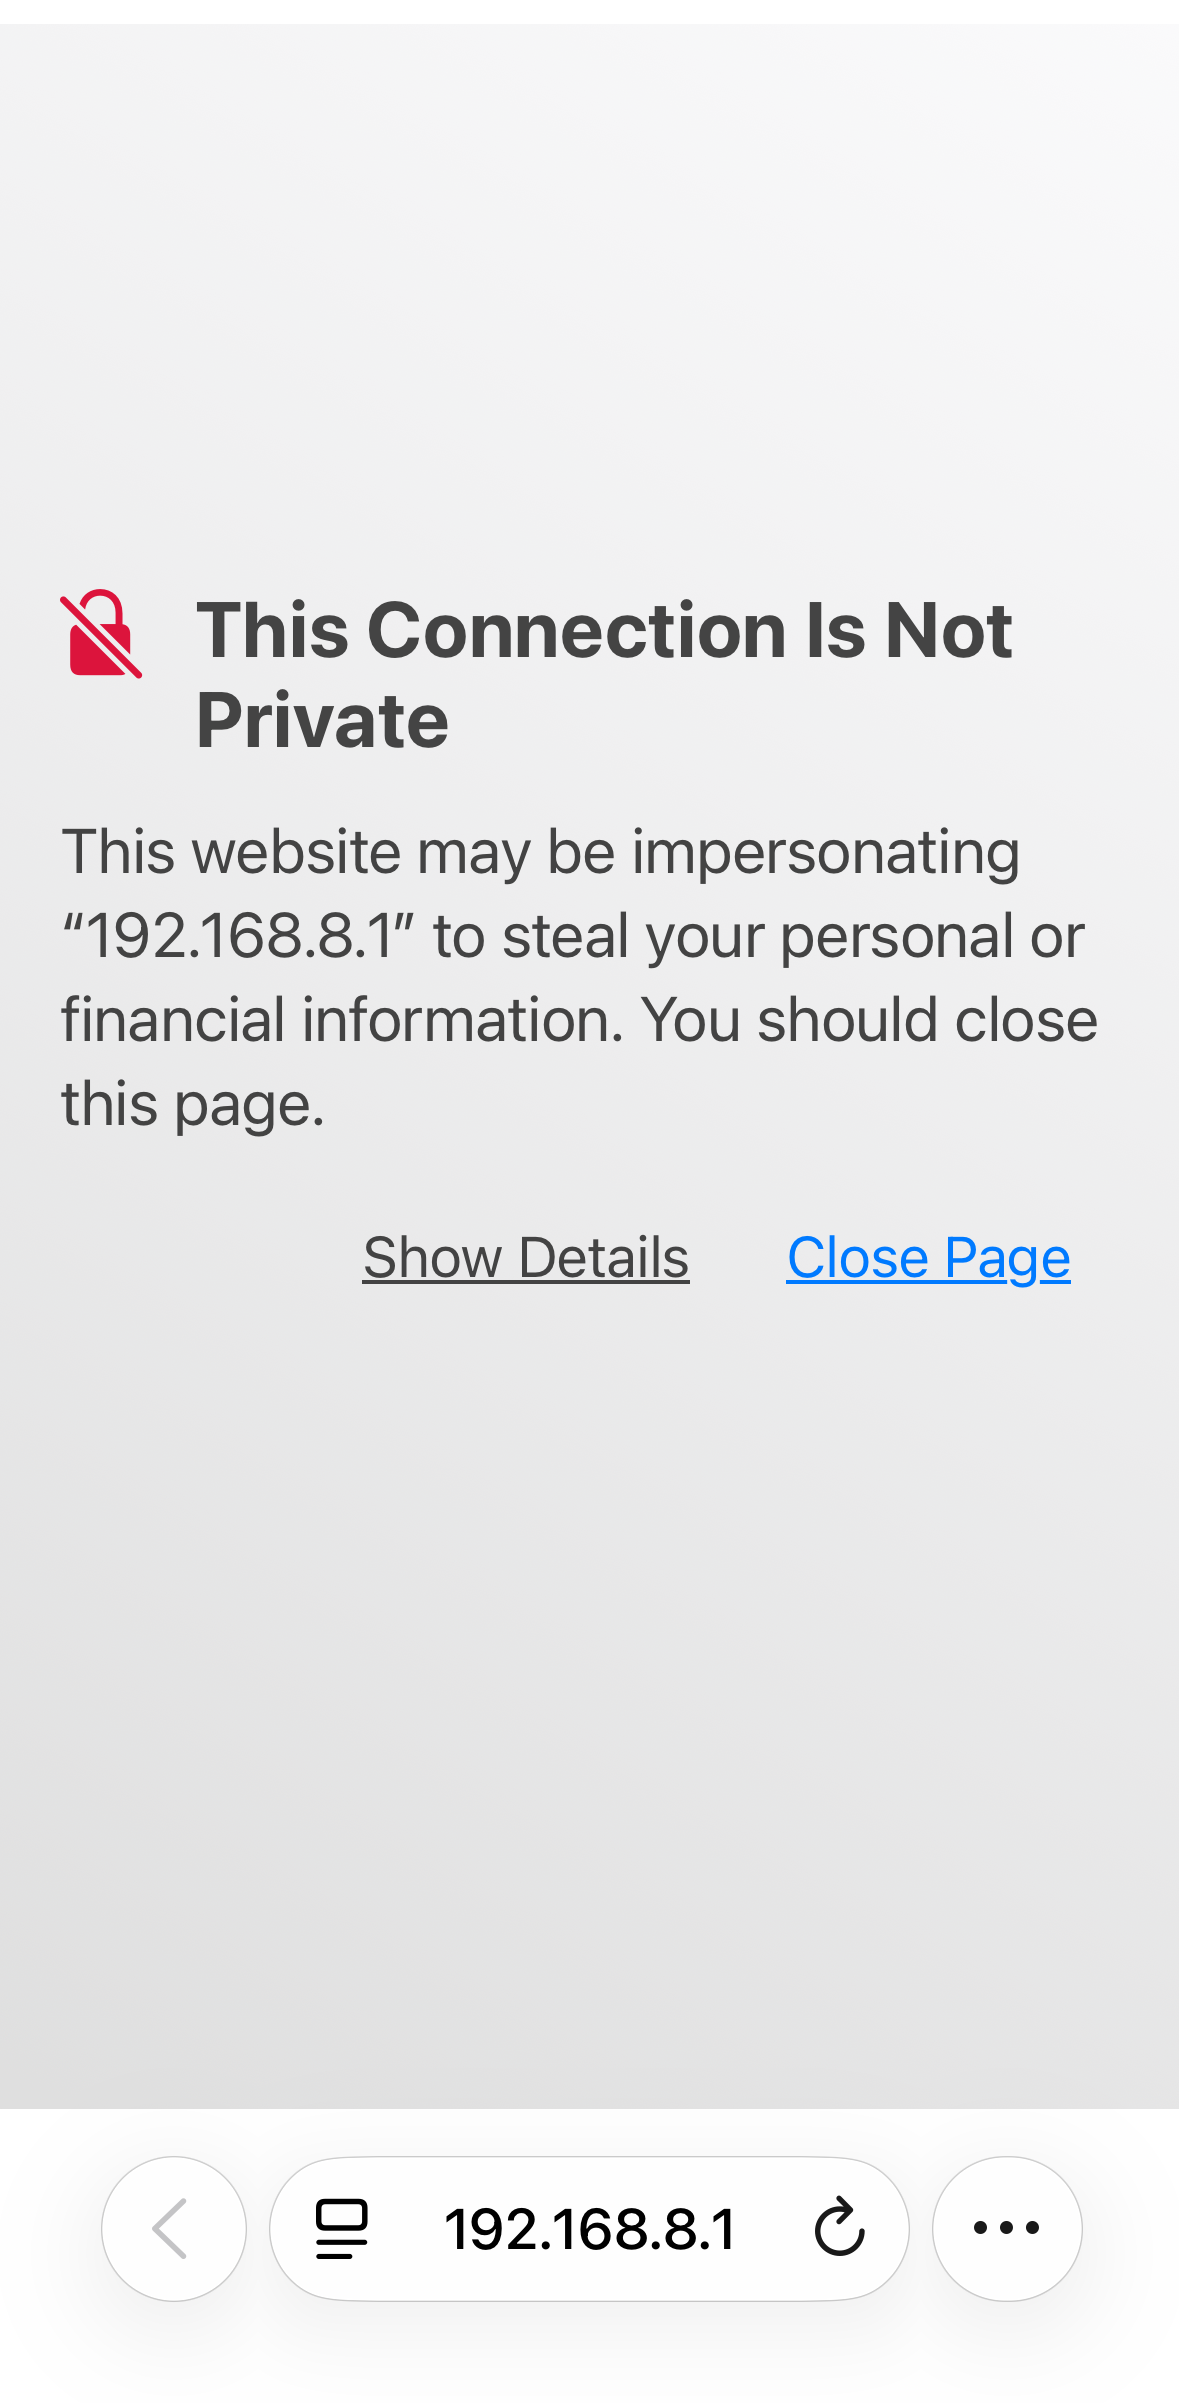
"This Connection Is Not Private" needs a check. Confirm you are on your Away unit's Wi-Fi and typed exactly http://192.168.8.1/setup/. If the browser still shows a certificate warning, stop and contact support. Do not assume a warning is harmless or enter account credentials into an unexpected page.
"No Internet Connection" in your Wi-Fi list is normal too, until setup finishes and the Away unit links to home. Nothing to fix.
Same license screen as the Home unit. Each unit gets its own acceptance flag, so you'll see this once per unit.
Button greyed out for a moment? Same as the Home unit — right after boot the page briefly shows "Preparing your secure sign-in link…". Wait a few seconds and the button becomes tappable.
Within a few seconds, the page advances. The Away unit automatically detects your Home unit on the network and configures itself to route through it.
whatismyip.com or ifconfig.me.This is a basic connectivity check, not proof of the tunnel when both units are on your home internet: a direct path could show the same IP. Complete the off-network rehearsal below before relying on it while traveling.
You can disconnect from the Away unit and shut it off until you're ready to travel.
Before you depend on PacketMole on an actual trip, rehearse from a different network:
http://192.168.8.1/setup/. The setup page shows a list of nearby Wi-Fi networks the Away unit can see.whatismyip.com. You should see your home IP — the same one you saw in Step 6, even though you're physically away from home and on a totally different network.If that works, you're ready to travel with confidence. If it doesn't, see the troubleshooting section at the end of this manual or email support@packetmole.com — much better to discover it at the coffee shop than after you've landed in Tokyo.
Captive portal at the venue? If the venue requires a web sign-in before the Away unit can reach your Home unit, open the PacketMole setup page and use Venue sign-in window. It temporarily permits that device's DNS and web traffic to use the venue for up to five minutes; that traffic will not have your home IP. Other devices' internet traffic remains blocked. Close private apps first, complete the venue page, then tap Close sign-in window now. If the venue still refuses the router, ask its staff for help or use a phone hotspot.
The pending safety firmware configures connected devices to use Cloudflare's public 1.1.1.1 / 1.0.0.1 DNS resolvers at all times. Normally those DNS queries travel through your Home unit; during the temporary venue sign-in window, the requesting device's queries go directly through the venue connection. PacketMole does not receive or store those queries; Cloudflare processes them under its own privacy terms.
Your Away unit ships with a random residential-sounding Wi-Fi name (something like Plum-Leopard-847) that blends in with personal home networks. Many customers leave it alone. Some prefer to rename it — either to match their actual home Wi-Fi name (so all their devices feel "at home" everywhere) or to pick something even more discreet.
To rename it:
http://192.168.8.1/setup/.Privacy tip. A Wi-Fi name is broadcast nearby. Avoid putting your name or other personal or sensitive information in it, and follow the venue or network owner's rules. The original randomized name is a reasonable default.
The new name + password are remembered across reboots and future firmware updates, so you only need to do this once.
This is what you actually do once you're away from home.
Most hotel rooms and Airbnbs have plenty of power outlets. Cafes have fewer; a portable battery is fine if you're working from a cafe for a few hours.
Traveling internationally? The included AC adapter is for the Home unit and stays at home. Bring a suitable 5V/3A USB-C supply for the Away unit. Check that your supply supports the destination's mains voltage and plug type; a plug adapter alone does not convert voltage.
This is the same Wi-Fi network and password you set up at home. Nothing changes when you travel — your phone remembers it from setup, and rejoins automatically.
Have your Away Wi-Fi password with you, just in case. You normally won't need it — your devices reconnect on their own. But if you ever add a new device, or one forgets the network, you'll need the Away unit's Wi-Fi name and password to get back on — and you can't recover it from the setup page once you're away (you have to be on that Wi-Fi to reach the page). This is exactly what the password-manager entry from setup is for; make sure it's saved there before you leave.
Make your private Wi-Fi each device's ONLY connection. If a laptop is on your private Wi-Fi but also connected to the venue's network — the venue's Wi-Fi saved on the laptop itself, or an Ethernet cable from the room's wall jack — the computer may quietly prefer the venue's path, and that traffic goes out with the venue's address instead of your home's. While traveling: disconnect (or forget) the venue's Wi-Fi on each device, and don't plug in any Ethernet cable that isn't from the Away unit. The Away unit can only protect traffic that actually goes through it.
This is the one-minute step you do at every new venue. The Away unit needs to connect to the hotel's, cafe's, or AirBnB's Wi-Fi as a client so it can reach the internet.
http://192.168.8.1/setup/.Within another few seconds, your tunnel back home re-establishes itself, and any device connected to your private Wi-Fi is now browsing as if it were at home.
Many venues use a captive portal. On the setup page, use Venue sign-in window only when the venue requires its web page. The five-minute window allows the phone or laptop that opens it to send DNS and web traffic through the venue directly, without your home IP. Other devices' internet traffic remains blocked. Close sensitive apps first and close the window as soon as the venue accepts the router. If that does not work, ask the venue for help or use a phone hotspot.
Three backup options, easiest first:
http://192.168.8.1/setup/ and pick your phone's hotspot from the venue Wi-Fi list. Enter the hotspot password.The Away unit now treats your phone's hotspot as the venue Wi-Fi. Your devices on the private SSID get internet via cellular, still tunneled back home. One unlock action on your phone covers the whole Away SSID.
Slightly more setup, but doesn't drain your phone's battery as fast as broadcasting Wi-Fi:
If you carry a USB cellular modem (LTE/5G dongle) with a local SIM card, plug it into the Away unit's USB 3.0 Type-A port. It will be detected automatically.
Some hotels block VPN-style traffic. If home is unreachable or you see the wrong public IP, stop sensitive activity and check the connection. A setup status label is not proof of the route taken by every device.
Two workarounds:
About fail-closed protection: blocking traffic when the Home tunnel is lost is intentional and has been tested in that scenario. That test does not establish protection for every startup, sign-in expiry, restart, firmware, or IPv6 condition. Do not rely on an absolute no-leak guarantee; keep your devices off alternate venue/cellular paths and verify the connection before sensitive use. Contact support if uncertain.
Network security software can interfere — even on a home network. Some routers run built-in security suites (Netgear Armor, eero Secure, Bitdefender, and similar) that automatically scan, quarantine, or throttle new or unrecognized devices. If your Away unit joins a network but your devices still can't get online — or the internet keeps cutting out — that network's security software may be the cause, and this can happen on a friend's or relative's home Wi-Fi, not just hotels.
The setup page will flag this for you. When PacketMole notices the connection dropping or refusing to hold, the setup page (http://192.168.8.1/setup/) shows a notice naming this exact cause — so you don't have to guess. If you see it, that's your sign to check the network's security software.
What to do: ask whoever manages that network to open their router's app, find the newly-added device (it shows up as a "GL.iNet" router), and mark it allowed / trusted — or temporarily pause the security feature to test. Once it's trusted, the Away unit should hold a steady connection.
Once setup is done, there's nothing to manage.
http://192.168.8.1/setup/, you're done.Software updates are downloaded from PacketMole's update server and scheduled overnight, roughly 2 AM to 5 AM in the router's configured time zone. Updates are cryptographically signed, and the updater attempts rollback when its health checks fail. Recovery is not guaranteed for every failure; contact support if the unit does not recover. Each unit updates independently. You can turn automatic updates off from its setup page (http://192.168.8.1/setup/, on the All set screen), though we recommend leaving them on for security fixes.
Check with support before upgrading GL.iNet firmware. PacketMole's automatic updates are separate from the router's built-in Online Upgrade. A compatible, settings-preserving upgrade may restore PacketMole automatically, but a factory reset or incompatible firmware can need manual recovery. An untested-firmware notice is not a compatibility certification. Email support@packetmole.com before changing the base firmware.
If something stops working, walk through this in order. Most issues are solved by Layer 1 in under a minute.
The most common fix is a power cycle. Both routers are designed to recover automatically from glitches when restarted.
This happens occasionally — Tailscale logins last a long time but eventually expire, especially if you've been away for many months.
http://192.168.8.1/setup/.The setup page is always available, not just at first boot. Re-signing-in is the same flow as initial setup.
Rare, but PacketMole is designed to recover from this without us touching your unit.
http://192.168.8.1 (the "Advanced settings" link on the PacketMole setup page also takes you there).Many update problems can be handled remotely. Some failures need local recovery steps, repair, or return shipment; support will help determine the appropriate next step.
Maybe you've moved, or you sold your house, or you just want a clean state.
Hardware failure. Power supplies fail occasionally; the routers themselves rarely fail in the first year.
If you'd rather not run any steps yourself, we can often log in and repair your unit remotely — but only if you invite us, and only for as long as you choose.
PacketMole runs on Tailscale, which has a built-in device-sharing feature. You can share just your PacketMole unit with our support team — not your phone, your laptop, or anything else on your network.
You stay in control the whole time: it's your Tailscale account, you grant the access, and you can revoke it the moment we're finished. We keep no standing access to your network — the same as our promise that there's no account with us.
| Symptom | Likely fix |
|---|---|
Setup page (192.168.8.1) won't load |
Make sure your device is connected to the right router, not your home Wi-Fi. On laptop: turn Wi-Fi off, use Ethernet. On phone: confirm it's on the Away unit's Wi-Fi network (the name on the setup card, or whatever you renamed it to). |
| Away unit shows "Connected" but websites don't load | Check Home power/internet and sign-in; a venue portal or filtering may also block access. Ask the venue about router access or try a phone hotspot. |
whatismyip.com shows the wrong IP (not your home IP) |
The tunnel didn't establish. Walk through Layer 1 power cycle, then Layer 2 sign-in. |
| Setup page shows "no home unit found" on Away | The Home unit at home is offline. Check that it's plugged in and your home internet is up. Have someone at home power-cycle it if needed. |
| Status light is red | See Layer 1 (power cycle) above. |
Do I need to keep the Home unit running 24/7? Yes. It's the anchor your Away unit reaches back to. It uses about as much power as a USB phone charger.
What if the Home unit needs a restart while I'm away? Before traveling, set up and test a remotely controlled smart plug. For most customers: Kasa HS103, which needs no hub and has a straightforward remote-control app. Advanced recovery: Shelly Plug US Gen4, our bench model, whose device-local auto-on timer adds protection if an on command does not arrive.
Leave the plug on and do not schedule routine PacketMole reboots. To restart Home, turn it off for 10 seconds, turn it on, and wait 60 seconds. Smart plugs are optional, sold separately, and work remotely while your home has power and internet.
Is it normal for the Home unit to feel warm or even hot? A fanless aluminum enclosure can feel warm, but touch alone cannot establish safe operation. GL.iNet specifies an operating ambient range of 32–104°F (0–40°C) for both units; that is not a case-surface temperature limit. Keep them dry and ventilated. Stop using a unit or supply that has damage, an unusual smell, repeated shutdowns, or concerning heat, and contact support.
Does this slow my home internet down? No noticeable effect. The Home unit only sends data when your Away unit is actively in use. When you're not traveling, it's idle.
Can I use PacketMole with multiple homes? V1 supports one home and one or more travel units. Multi-home failover (e.g. summer house + winter house) is on the roadmap.
What if I have multiple travelers in the family? Buy a second Away unit. Both can connect to the same Home unit at the same time, on the same Tailscale account. (Contact support for an Away-only purchase.)
Will my speed be slower abroad? Some — your traffic round-trips through your home internet. Latency and throughput depend on physical distance, both internet connections, relay/direct-path conditions, and the service in use. Test your actual setup before relying on it for a time-sensitive call or other important task.
Does PacketMole work in countries that block VPNs (China, Iran, etc.)? Do not rely on PacketMole to bypass national filtering. Network access and restrictions vary, and we do not guarantee operation in countries that block VPNs. Check local requirements and service availability before travel.
Is my traffic encrypted between the two routers? Yes. End-to-end, with WireGuard cryptography (the same standard used by major commercial VPNs). Tailscale's relays — used as a fallback when direct connection fails — see only ciphertext.
Does PacketMole see my traffic? No. We don't run the network — Tailscale does, and they only see encrypted relay packets when direct connection fails. We don't operate any infrastructure that handles your data.
Do I have to pay anyone monthly? PacketMole does not charge a subscription. Tailscale's Personal plan is currently free for eligible non-commercial use; its terms and pricing are controlled by Tailscale. Business use may require a paid plan. See tailscale.com/pricing.
What if PacketMole shuts down? Your routers and Tailscale account belong to you, but support, recovery downloads and PacketMole updates depend on us. Continued operation also depends on Tailscale, compatible software and your internet connections; we cannot guarantee indefinite operation if those dependencies change.
Can I use PacketMole with my work VPN? Many work VPN clients can run on top of PacketMole, but compatibility and employer policy vary. When the tunnel is connected, an IP-based check sees your home IP. PacketMole does not change GPS, device-attestation, account, nearby-Wi-Fi, or authorization signals. Check your employer's rules and test the exact configuration before relying on it.
Is this legal? You are responsible for how you use PacketMole, including compliance with applicable laws and your agreements with third-party services. PacketMole does not guarantee access to any particular service or establish that you satisfy its physical-location or eligibility requirements. See packetmole.com/legal/terms for the full responsibility and severe-abuse policy.
Power and operating-temperature specifications above are from GL.iNet's gl-inet.com/products/gl-mt2500/ and gl-inet.com/products/gl-mt3000/ pages, checked September 3, 2026. They are vendor specifications, not a new PacketMole bench certification.
Configured and individually tested in Delray Beach, Florida, using GL.iNet router hardware. We're a small independent shop — the same person who designed the firmware answers your support emails.
PacketMole was designed around three principles, in order:
Thanks for choosing PacketMole. We hope it makes travel a little less annoying.

— The PacketMole team
This website-only manual is version 1.19, dated 2026-09-15. The latest version is at packetmole.com/manual. The separate Quick Start booklet is the printed guide included in the box.
PacketMole™ is a product of Slick Engineering & Consulting, Inc.. © 2026 Slick Engineering & Consulting, Inc.. All rights reserved.